Install Raspbian OS
First thing to do is burn an image of the latest Raspbian - Raspberry Pi's official operating system - onto an micro SD card. Don't skimp on the card, you want something that is reliable and fast. I got a pack of SanDisk Ultra 16GB and have had no issues, including when running Windows IoT Core which requires a lot speed.
I won't go over how to install Raspbian, as the official site does a great job and the recommended versions are updated regularly:
 Raspberry Pi Documentation
You can either install NOOBS or download the latest version of Raspbian directly (which is Raspbian Buster at the time of writing). The Lite version is fine for IoT, which omits things like the desktop, which we won't need but would still consume resources.
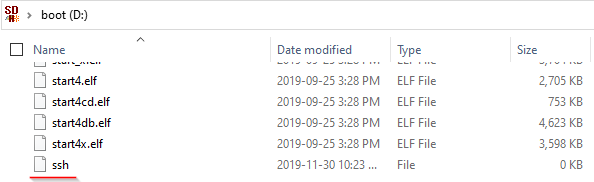
Enable SSH
You can hook up a keyboard and monitor to your Pi and access your terminal that way, but it is easiest just to set things up headless.
After you have burned the Raspbian OS image to your SD card, open the card and simply create an empty file called ssh at the root. Your Pi will read that on boot and will enable SSH.
Configuring wifi
To configure wifi, create a wpa_supplicant.conf file at the root. This file is read by the Pi when it boots and allows you to configure a wifi connection.
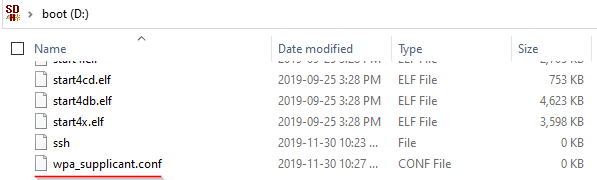
The contents of wpa_supplicant.conf will be:
ctrl_interface=DIR=/var/run/wpa_supplicant GROUP=netdev
update_config=1
country=<Insert country code here>

network={
 ssid="<Name of your WiFi>"
 psk="<Password for your WiFi>"
}
Note the country code is based on the ISO 3166-1 alpha-2 code standard.
Accessing your Raspberry Pi
If everything worked, you should now see a new raspberrypi device on your LAN.

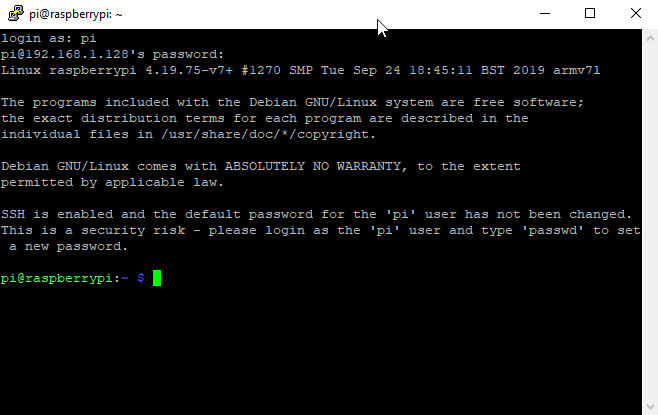
Using Putty (or some other ssh client), you can now shell into your Pi:
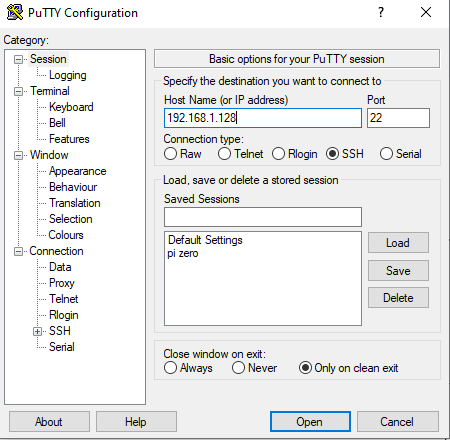
You will be asked if you are certain you want to connect to this new device, click "Ok". Once you have connected, you will be asked for these credentials:
username: pi
password: raspberry
You should now have shell access to your Pi:
Update the hostname
If you plan on having multiple Pis on your network, they should each have a unique hostname so you can properly identify them. You need to update the name in two places:
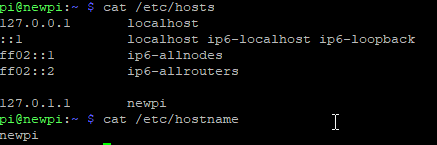
sudo nano /etc/hostname There is a single line with raspberrypi written. Update it to whatever you wish your new hostname to be.
sudo nano /etc/hosts Find the line with 127.0.1.1 raspberrypi and update raspberrypi to your new hostname.
Here are what my files look like after renaming the hostname to newpi:
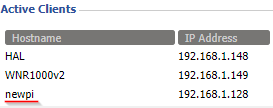
Reboot your Pi and the new hostname should be present in your LAN:
Assigning a static IP (optional)
As a convenience, we can ensure that when the Pi connects to the local network, it is assigned the same, predictable address.
Take care to keep track of the IP addresses you assign! If the same IP address is assigned to multiple devices, it will cause no shortage of issues and hair pulling.
As an alternative to a static IP, you can use something like DNSMasq which is installed on my router with dd-wrt firmware. By settingdhcp-host=C8:37:FB:5E:02:F3,newpias an option, I can now ssh into it by specifying its address likenewpi.hardie.lanEnsure you don't connect multiple devices on your network with the same hostname you have specified in a DNSMasq option!
To configure a static IP, we need to edit the dhcpcd.conf config file:
sudo nano /etc/dhcpcd.conf
There is a commented out template for setting up a static IP under "Example static IP configuration:"
We will use the template to assign a static IP to our wifi adapter:
interface wlan0
static ip_address=192.168.1.128/24
static routers=192.168.1.1
static domain_name_servers=192.168.1.1 8.8.8.8
Double check your router address, and then reboot your device. It will now always be assigned the static IP per the new configuration.
I'm unsure how applicable this is to other router firmware as I have been using dd-wrt exclusively for well over a decade, but if I assign a static IP to my Pi like this, dd-wrt will show a * for the hostname. Under Services, I need to configure a static lease and register the hostname with the MAC address.Setting up a file share for Windows
If you are a crackerjack vim user, you can do all your coding inside your shell. But if you're like me and a few other people, you probably want a more fully-featured IDE. My setup has me coding using VS Code on my Windows laptop, but writing to my Pi where I can execute my code.
I need to create the folder I am going to mount:
sudo mkdir -p /home/pi/Documents/Repos
Change the owner to our pi account, which we'll also setup to be our networking account shortly:
sudo chown -R pi /home/pi/Documents/Repos/
In preparation of installing some dependencies, it's a good idea to do a system update:
sudo apt-get update
Once that is done, install a couple Samba dependencies:
sudo apt-get install samba samba-common-bin
If asked if you want to install a dhcp-client, answer yes. Once installed, open Samba's config file:
sudo nano /etc/samba/smb.conf
Ensure the workgroup property is set to WORKGROUP which is Window's default.
# Change this to the workgroup/NT-domain name your Samba server will part of
workgroup = WORKGROUP
Scroll to the bottom and add the following:
[PiShare]
 comment=Raspberry Pi Share
 path=home/pi/Documents/Repos
 browseable=Yes
 writeable=Yes
 only guest=no
 create mask=0777
 directory mask=0777
 public=no
We need a user account for authenticating a request to connect to our share. We will use the existing pi account:
sudo smbpasswd -a pi
Enter your Samba password twice and then resart Samba:
sudo systemctl restart smbd
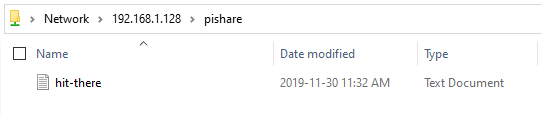
Before we open the share, let's put a file in it:
sudo touch /home/pi/Documents/Repos/hi-there.txt
Open Windows Explorer and enter the IP of the Pi (in my case 192.1.68.1.128 followed by the name of the share (PiShare): \\192.168.1.128\PiShare
You will be asked for your network credentials, remember to qualify your username with your hostname you setup earlier. The default would be raspberrypi but in my case I updated my hostname to newpi so my qualified username is newpi\pi . My password is the Samba password I set a couple steps ago.

If everything we well, you should now be able to browse the share:
Installing Git
Source control is mandatory for any serious dev work. I have Gitlab setup on my Synology DiskStation, so I need to install git on my Pi and some ssh keys to connect.
sudo apt-get install git
How you connect to git - https or ssh - will depend on your installation. I use ssh keys so at this point I would copy my keys over to ~/.ssh so that I can authenticate with Gitlab and pull down my projects to be run on my Pi.
Installing Node on Raspberry Pi (optional)
I do a lot of Javascript programming, and many of my IoT projects are written in Node, so Node is a standard part of my setup. Python is already installed in the Pi, so if you are going to use that, you can skip this section entirely.
Installing Node is a little bit more involved. I don't use apt-get as I've never got it to work properly on a Pi Zero, and there is also a conflicting node package on Debian (the OS Raspbian is based on) so we would need to install nodejs and create a symlink, which seems like a bit of bother.
To that end, the following instructions should be universal for setting up Node on any Pi version. But to know what version of Node to download, we need to get the processor architecture of our device:
uname -m
That will print out something like arm71 or armv6l. Next we visit the Node download page and find the latest LTS version. My Pi 3 is advertising a arm71 processor, so I will download and extract the package like so:
wget https://nodejs.org/dist/v12.13.1/node-v12.13.1-linux-armv7l.tar.gz
tar -xzf node-v12.13.1-linux-armv7l.tar.gz
Copy the extracted contents to /usr/local:
sudo cp -r node-v12.13.1-linux-armv7l/* /usr/local
Check installation went alright:
node --version
You should get something like v12.13.1