In the course of building my IoT Home Automation platform, I needed something to facilitate real-time communication between my IoT devices and my clients (web pages, React Native web apps, etc...). I went with SignalR's PAAS offering in Azure - SignalR Service.
I've played with SignalR off and on since it was released, and in the course of building apps with it, it became apparent that I would end up writing near-identical functions over and over. Users need to connect. Users need to enrol in groups. Users need to send messages.
What's cool about SignalR Service is there is a serverless option that means next to no setup necessary, no infrastructure to worry about, and the repetitive back-end code I used to have to write has been replaced with terse Azure Functions. Azure Functions are another serverless PAAS offering that lets you run code without worrying about infrastructure. You can write them in .Net, Python, Java, Javascript - or in my case - Typescript!
Pre-requisites
- VS Code - Microsoft's lightweight IDE
- Azure Functions for Visual Studio Code Extension - lets you create, manage and deploy Azure Functions from within Visual Code
- Azure Functions Core Tools -
npm install -g azure-functions-core-tools - An Azure subscription
Create the SignalrR Service resource
Bring up the Azure Portal and find the SignalR Service. Specify your subscription and resource group, and specify the Free pricing tier and Serverless option for ServiceMode.
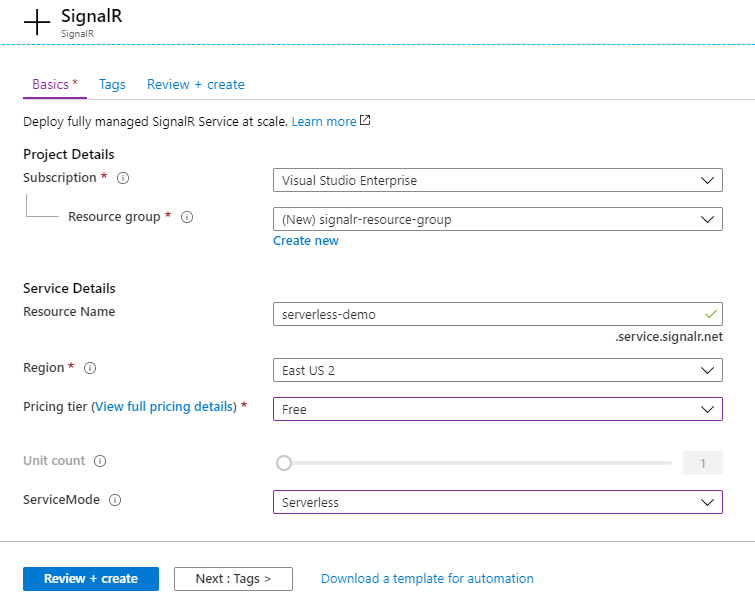
The Free tier is more than enough for my needs. It provides a single unit, which allows for 20 concurrent connections and 20,000 messages. Note that I will not be connecting IoT devices to SignalR Service, only my clients, which will only be a handful. (I'll go into detail about the end-to-end flow of messages from devices to clients via SignalR in a future post.)
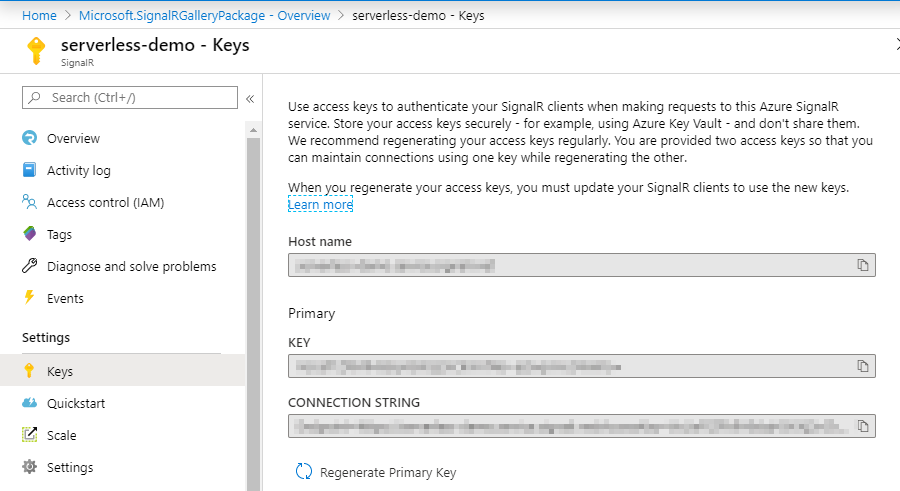
Once the deployment is complete, take note of the keys and connection strings that have been generated, our Azure Functions will need them.
Create your first Azure Function in VS Code
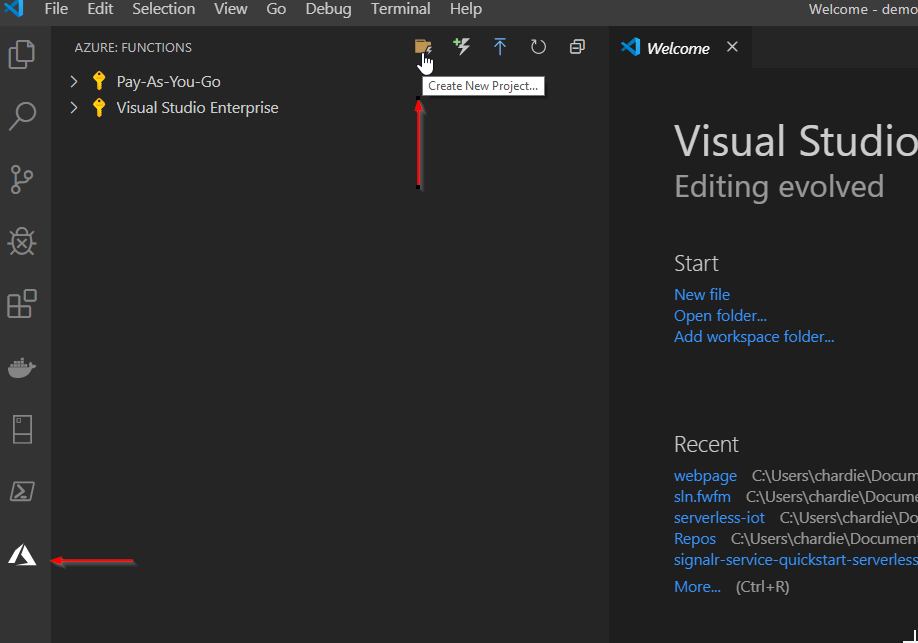
After you have installed the Azure Functions extension mentioned above, a new Azure menu item in the sidenav will appear. Click on it, and then click on the Create New Project button at the top:
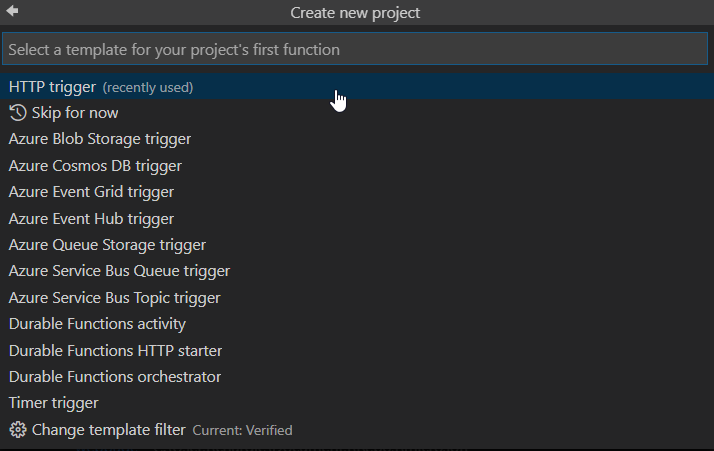
Select the folder to create the new project in. For my language choice, I've selected Typescript. Choose to make a HTTP Trigger function.
Name it negotiate - this name is important as it will be used for an endpoint name that SignalR Service will consume based on convention.

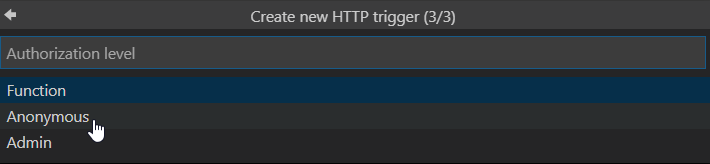
For Authorization Level, choose Anonymous
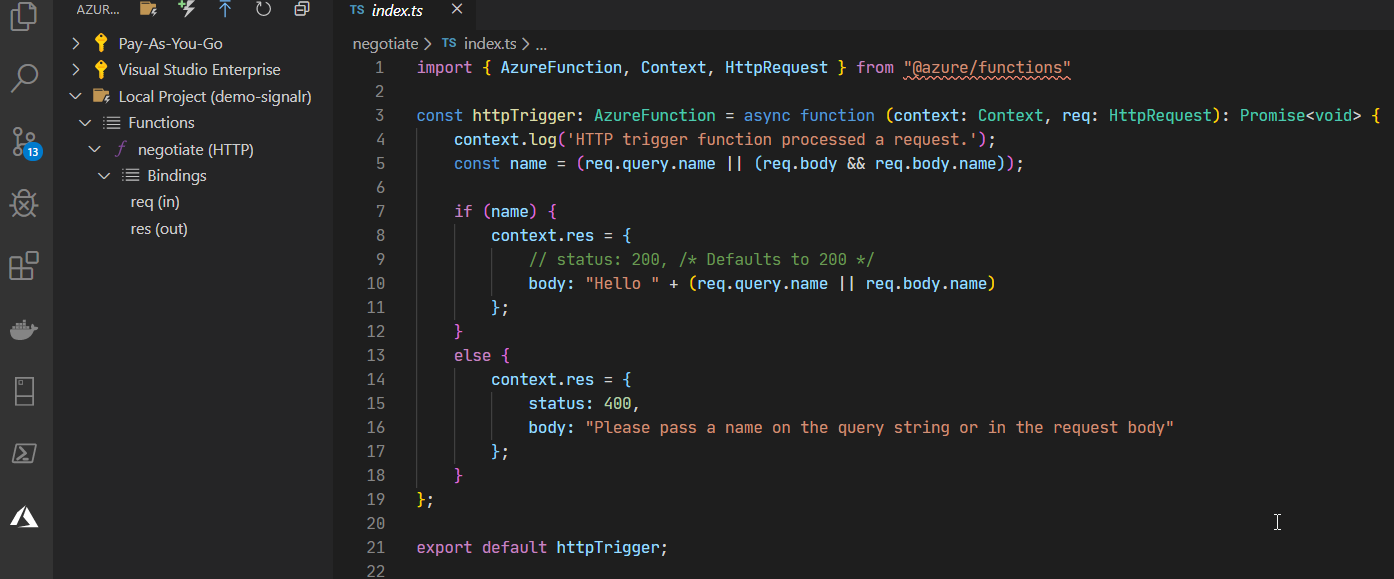
Once that's done, a new Azure Function will be added to the project with boilerplate code. The project view shows a high-level overview of your functions and their bindings which we'll discuss shortly.
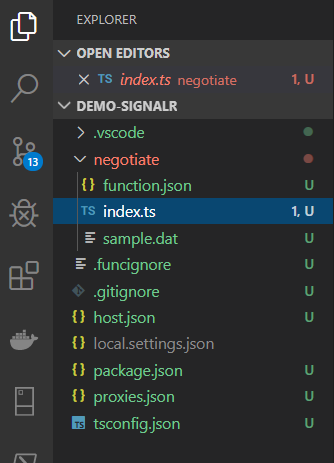
Click on the Explorer button in the sidenav and you can see a number of things have been created on disk.
Manage settings with local.settings.json
While developing locally, settings will be read in from local.settings.json We'll need to include our SignalR Service connection string we captured from the portal, and we'll also need to configure CORS as our webpage will end up in a domain different than our Azure Functions domain.
{
  "IsEncrypted": false,
  "Values": {
    "AzureSignalRConnectionString": "<ENTER CONN STRING HERE>",
    "FUNCTIONS_WORKER_RUNTIME": "node",
  },
  "Host": {
    "LocalHttpPort": 7071,
    "CORS": "http://localhost:8080",
    "CORSCredentials": true
  }
}
negotiate Azure Function
The purpose of this function is to negotiate a token from the SignalR Service and provide it to the client. The client will then supply the token to SignalR Service for authentication.
Edit negotiate's function.json
Open /negotiate/function.json for editing. This file supplies configuration details at the function level. Looking at the boilerplate, you can see that a couple bindings have been included that are standard for a HTTP trigger.
{
  "bindings": [
    {
      "authLevel": "anonymous",
      "type": "httpTrigger",
      "direction": "in",
      "name": "req",
      "methods": [
        "get",
        "post"
      ]
    },
    {
      "type": "http",
      "direction": "out",
      "name": "res"
    }
  ],
  "scriptFile": "../dist/negotiate/index.js"
}
Bindings are resources that you can declaratively attach to your functions. Input bindings are triggers that invoke the function, while output bindings are where the Azure Functions emit their result.
Bindings are optional, there's nothing stopping you from writing imperative code inside your function. But if you have a binding available to you, they can be an excellent choice to reduce the amount of code you need to write. We'll see how the repetitive back-end code I used to have to write has been minimized by leveraging existing bindings.
We are going to make a couple changes to this file. We are going to alter the input binding's route so we can supply a userId to SignalR service, which is a mandatory piece of identity we need to supply if we want to enrol our users into groups.
    {
      "authLevel": "anonymous",
      "type": "httpTrigger",
      "direction": "in",
      ...
      "route": "{userId}/negotiate"
    },
    ```
We will now add an additional input binding so that we can accept real-time communication from our SignalR Service hub called chat:
	{
      "type": "signalRConnectionInfo",
      "name": "connectionInfo",
      "hubName": "chat",
      "direction": "in",
      "userId": "{userId}"
    }
At the end your function.json should look like this:
{
  "bindings": [
    {
      "authLevel": "anonymous",
      "type": "httpTrigger",
      "direction": "in",
      "name": "req",
      "methods": [
        "post"
      ],
      "route": "{userId}/negotiate"
    },
    {
      "type": "http",
      "direction": "out",
      "name": "res"
    },
    {
      "type": "signalRConnectionInfo",
      "name": "connectionInfo",
      "hubName": "chat",
      "direction": "in",
      "userId": "{userId}"
    }
  ],
  "scriptFile": "../dist/negotiate/index.js"
}
Edit negotiate's index.ts
This is where the declarative binding really starts to shine. Delete the contents of /negotiate/index.ts and replace it with the following:
import { AzureFunction, Context, HttpRequest } from "@azure/functions"

const httpTrigger: AzureFunction = async function (context: Context, req: HttpRequest, connectionInfo: any): Promise<void> {
    context.res.json(connectionInfo);
};

export default httpTrigger;
This one liner negotiates authentication tokens from SignalR Server and provides them to our clients so they can authenticate. Easy!
joinGroup Azure Function
SignalR has the concept of groups, which allows for messaging to be targeted to a subset of connected users. They aren't strictly necessary, but for my IoT Home Automation platform, they are useful so that I can direct data from my devices to only the clients that wish to observe that data by joining a group with the name of the device's ID.
Go ahead and create another HTTP Trigger Azure Function like before, but this time call it joinGroup.
Edit joinGroup's function.json
Again, we are going to leverage a pre-existing binding that exposes SignalR group management actions. We are going to add the signalRGroupActions binding to the bottom of the file, which should now look like:
{
  "bindings": [
    {
      "authLevel": "anonymous",
      "type": "httpTrigger",
      "direction": "in",
      "name": "req",
      "methods": [
        "post"
      ]
    },
    {
      "type": "http",
      "direction": "out",
      "name": "res"
    },
    {
      "type": "signalR",
      "name": "signalRGroupActions",
      "hubName": "chat",
      "direction": "out"
    }
  ],
  "scriptFile": "../dist/joinGroup/index.js"
}
Edit joinGroup's index.ts
Again, we'll leverage our declarative binding to enrol a user into a group. We will also accept the group's name as a querystring parameter. If the group doesn't exist, the group will be created.
import { AzureFunction, Context, HttpRequest } from "@azure/functions";

const httpTrigger: AzureFunction = async function(
  context: Context,
  req: HttpRequest
): Promise<void> {
  context.bindings.signalRGroupActions = [
    {
      userId: req.query.userId,
      groupName: req.query.groupName,
      action: "add"
    }
  ];
};

export default httpTrigger;
leaveGroup Azure Function
This function is nearly identical to the joinGroup function so I won't dive into it. The function.json is the same, but there is a slight change to the index.ts to indicate a different group action:
import { AzureFunction, Context, HttpRequest } from "@azure/functions";

const httpTrigger: AzureFunction = async function(
  context: Context,
  req: HttpRequest
): Promise<void> {
  context.bindings.signalRGroupActions = [
    {
      userId: req.query.userId,
      groupName: req.query.groupName,
      action: "remove"
    }
  ];
};

export default httpTrigger;
sendToGroup Azure Function
The final function we need will send messages to members of a specific group. Create another HTTP Trigger function like before.
Edit sendToGroup's function.json
We'll add the signalRMessages binding to the function.
{
  "bindings": [
    {
      "authLevel": "anonymous",
      "type": "httpTrigger",
      "direction": "in",
      "name": "req",
      "methods": [
        "post"
      ]
    },
    {
      "type": "http",
      "direction": "out",
      "name": "res"
    },
    {
      "type": "signalR",
      "name": "signalRMessages",
      "hubName": "chat",
      "direction": "out"
    }
  ],
  "scriptFile": "../dist/sendToGroup/index.js"
}
Edit sendToGroup's index.ts
We will supply the binding with three properties:
groupName- the name of the group we want to send a message totarget- this is the name of the function we want to invoke on our client. We'll go into this later where we code thehandleMessageusing the SignalR client library.arguments- this represents the arguments we pass into the target function we specified. We're going to pass our request body in.
import { AzureFunction, Context, HttpRequest } from "@azure/functions";

const httpTrigger: AzureFunction = async function(
  context: Context,
  req: HttpRequest
): Promise<void> {
  context.bindings.signalRMessages = [
    {
      // message will only be sent to this group
      groupName: req.query.groupName,
      target: "handleMessage",
      arguments: [req.body]
    }
  ];
};

export default httpTrigger;
If you want to send a message to a single user, remove thegroupNameproperty and replace it with"userId": "myUserId"
Running your Azure Functions locally
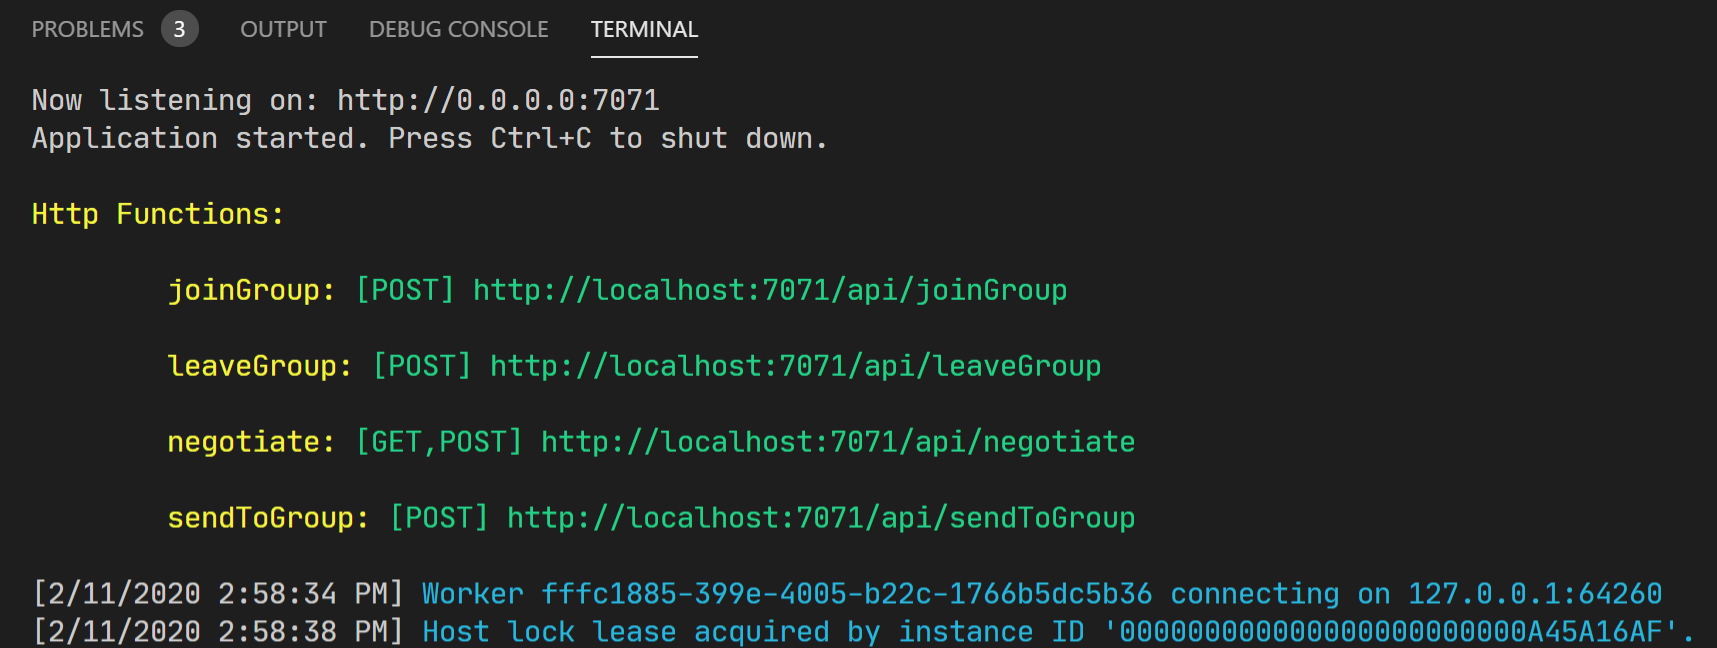
Now that our functions have been coded, hit F5 to start debugging. This will execute npm install, then npm build, followed by func host start
If everything worked. you should see a message indicating your application has started, and a list of your functions with their URLs.
Building our client web page
To test everything, we'll create a rudimentary webpage (I'll include full source at the bottom of this page until I get the code copied over to Github). Users will click checkboxes to join and leave a couple of groups - the Super Group and the Awesome Group. Users will also be able to send messages to those groups.
We'll start with this markup:
<div style="float: left; margin-right: 80px">
    <div>
        <input type="checkbox" id="superGroup" name="superGroup" >
        <label for="superGroup">Join super group</label>
    </div>
    <div>
        <input type="checkbox" id="awesomeGroup" name="awesomeGroup" >
        <label for="awesomeGroup">Join awesome group</label>
    </div>
</div>
<div style="float: left">
    <div>
        <label for="superGroupText">Send message to super group</label><br />
        <input type="text" id="superGroupText" name="superGroupText" />
        <button id="sendSuperMessage">Send</button>
    </div>
    <br />
    <div>
        <label for="awesomeGroupText">Send message to awesome group</label><br />
        <input type="text" id="awesomeGroupText" name="awesomeGroupText" />
        <button id="sendAwesomeMessage">Send</button>
    </div>
</div>
<br style="clear:both" />
<div id="log" style="margin-top: 50px" />
We are now going to create some functions that will consume the endpoints our Azure Functions have exposed. We'll start with the functions to join and leave groups. I'll use Axios to make this is a little easier on myself:
const username = new URLSearchParams(window.location.search).get("username");
var apiBaseUrl = "http://localhost:7071";

function joinGroup(groupName) {
    axios.post(
        `${apiBaseUrl}/api/joinGroup?userId=${username}&groupName=${groupName}`
    );
}

function leaveGroup(groupName) {
    axios.post(
        `${apiBaseUrl}/api/leaveGroup?userId=${username}&groupName=${groupName}`
    );
}
To send a message, we'll capture the text in an input and include it in the payload to our endpoint:
function sendMessageToGroup(groupName, buttonId) {
    const text = document.querySelector(buttonId).value;

    axios
        .post(`${apiBaseUrl}/api/sendToGroup?&groupName=${groupName}`, {
        sender: username,
        group: groupName,
        text: text
    })
}
Remember when we registered the handleMessage target in our sendToGroup Azure Function? We're now going to code its implementation to render the message onto the screen.
function handleMessage(message) {
    document.querySelector("#log").innerHTML = `<div>${JSON.stringify(
        message
    )}</div>`;
}
Finally, we need to build our SignalR connection, register the handler for the handleMessage target, and start it.
var connection = new signalR.HubConnectionBuilder()
    .withUrl(`${apiBaseUrl}/api/${username}`)
    .configureLogging(signalR.LogLevel.Information)
    .build();

connection.on("handleMessage", handleMessage);

connection
    .start()
    .catch(console.error);
The page needs to be served from a webserver, CORS will fail for a page served off disk. http-server can be used for this, just ensure it serves at http://localhost:8080 as that is the URL we specified in local.settings.json in our CORS configuration.
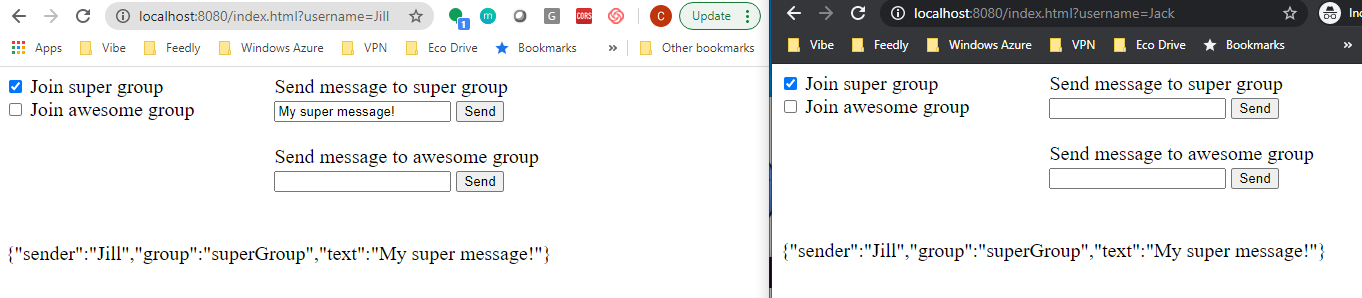
Once your server is up and running, browse to your page ensuring you include a username as a querystring parameter:
http://localhost:8080/index.html?username=Jack
If you open Devtools, you should see a happy message in your console indicating a successful connection.
[2020-02-11T17:43:24.224Z] Information: WebSocket connected to wss://serverless-demo.service.signalr.net/client/?hub=chat&id=C_tHxxx
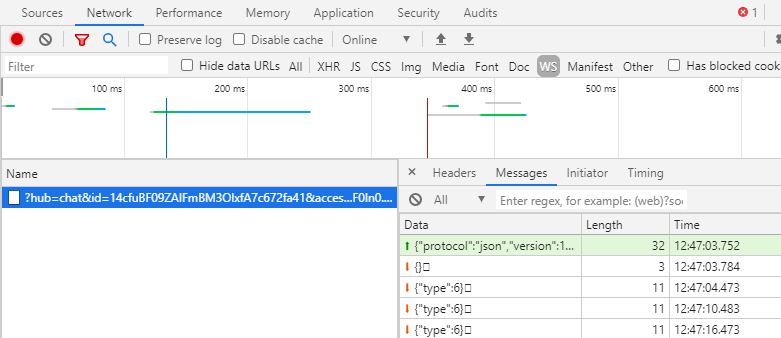
If you open your network tab and click on WS, you can select your websocket connection to see the frames being passed back and forth. In the capture below you can see {type: 6} being ferried around - it's a keepalive message. In the event that the browser doesn't send notification of a disconnection - say if there is a power failure - then the keepalive message won't be returned to SignalR indicating the connection is no longer valid.
Open a second browser window, and open your page but with a different username.
http://localhost:8080/index.html?username=Jill
You should now be able to join and leave groups, and send messages between the two users!
As promised, here is the full source of the webpage.
<html style="font-size: 20px">
  <body>
    <div style="float: left; margin-right: 80px">
      <div>
        <input type="checkbox" id="superGroup" name="superGroup" >
        <label for="superGroup">Join super group</label>
      </div>
      <div>
        <input type="checkbox" id="awesomeGroup" name="awesomeGroup" >
        <label for="awesomeGroup">Join awesome group</label>
      </div>
    </div>
    <div style="float: left">
      <div>
        <label for="superGroupText">Send message to super group</label><br />
        <input type="text" id="superGroupText" name="superGroupText" />
        <button id="sendSuperMessage">Send</button>
      </div>
      <br />
      <div>
        <label for="awesomeGroupText">Send message to awesome group</label><br />
        <input type="text" id="awesomeGroupText" name="awesomeGroupText" />
        <button id="sendAwesomeMessage">Send</button>
      </div>
    </div>
    <br style="clear:both" />
    <div id="log" style="margin-top: 50px" />
    <script src="https://cdn.jsdelivr.net/npm/@aspnet/signalr@1.1.2/dist/browser/signalr.js"></script>
    <script src="https://cdn.jsdelivr.net/npm/axios@0.18.0/dist/axios.min.js"></script>
    <script>
      const username = new URLSearchParams(window.location.search).get("username");
      var apiBaseUrl = "http://localhost:7071";

      function handleGroupChange(event, groupName) {
        if (event.target.checked) {
          joinGroup(groupName);
        }
        else {
          leaveGroup(groupName);
        }
      }

      function joinGroup(groupName) {
        axios.post(
          `${apiBaseUrl}/api/joinGroup?userId=${username}&groupName=${groupName}`
        );
      }

      function leaveGroup(groupName) {
        axios.post(
          `${apiBaseUrl}/api/leaveGroup?userId=${username}&groupName=${groupName}`
        );
      }

      function sendMessageToGroup(groupName, buttonId) {
        const text = document.querySelector(buttonId).value;

        axios
          .post(`${apiBaseUrl}/api/sendToGroup?&groupName=${groupName}`, {
            sender: username,
            group: groupName,
            text: text
          })
      }

      document.querySelector("#superGroup").onclick = (e) => handleGroupChange(e, "superGroup");
      document.querySelector("#awesomeGroup").onclick = (e) => handleGroupChange(e, "awesomeGroup");

      document.querySelector("#sendSuperMessage").onclick = () => sendMessageToGroup("superGroup", "#superGroupText");
      document.querySelector("#sendAwesomeMessage").onclick = () => sendMessageToGroup("awesomeGroup", "#awesomeGroupText");

      function handleMessage(message) {
        document.querySelector("#log").innerHTML = `<div>${JSON.stringify(
          message
        )}</div>`;
      }

      var connection = new signalR.HubConnectionBuilder()
        .withUrl(`${apiBaseUrl}/api/${username}`)
        .configureLogging(signalR.LogLevel.Information)
        .build();

      connection.on("handleMessage", handleMessage);

      connection
        .start()
        .catch(console.error);
    </script>
  </body>
</html>