Tensorflow is Google's open-source machine learning platform. It's pretty impressive, even for a machine learning layman like myself. It can be used for classifying and locating objects in an image, determining how toxic a message is, recognize sounds, predicting probabilities of future events, and way more.
Tensorflow has been ported over as a Javascript library that is compatible in both browser and Node.js runtimes. I got image classification and object detection up running with a few hurdles I'll call out in this post which will hopefully get smoothed out with time.
Image classification
Image classification is where we provide Tensorflow with an image, and it will indicate what class it believes the object represents.
Object detection
Object detection is where we provide Tensorflow with an image with possibly multiple objects, and it will indicate whether an object of a particular class has been detected. Some machine learning models will also provide a bounding box to show where each object is in the image.
Wait, what's a model?
A machine learning model is a set of assumptions used to make predictions about data. The models I have seen in my limited experience are trained by providing them large amounts of data and then having humans tell them what that data means. This is an example of supervised learning, where the model is trained on data where both the inputs and outputs are supplied.
Unsupervised learning involves providing inputs but no outputs, the model has to identify patterns on its own. I have no idea how this works :)
Pre-existing models
What's really cool about this concept of a model is that once they have been trained, they can be distributed to run on other Tensorflow instances. For instance, Google has created a detection model zoo where anyone can grab a copy of a model and run them without going through the labourious effort to train one themselves.
Those models are compatible with Tensorflow, which is written in Python, but if we want to stick with Javascript, there have been some models ported over to Tensorflow.js.
Setting up
- a Raspberry Pi 3 with at least Rasbian Buster updated and upgraded
- a Raspberry Pi camera
- Node.js v10 - I had issues with Node v12, and didn't attempt a previous version of Node.js
Create your project
On your Raspberry Pi, create a new folder called camera-test. cd into it and run npm init and use all the defaults.
Use the following for your package.json and run npm install:
{
  "name": "camera-test",
  "version": "1.0.0",
  "description": "",
  "main": "index.js",
  "scripts": {
    "test": "echo \"Error: no test specified\" && exit 1",
    "start": "ts-node index.ts --skipLibCheck true"
  },
  "author": "",
  "license": "ISC",
  "devDependencies": {
    "@types/node": "^13.7.1",
    "ts-node": "^8.6.2",
    "typescript": "^3.7.5"
  },
  "dependencies": {
    "@tensorflow-models/coco-ssd": "^2.0.1",
    "@tensorflow-models/mobilenet": "^2.0.4",
    "@tensorflow/tfjs-node": "1.2.11"
  }
}
Note the pinned version for @tensorflow/tfjs-node - there is a more recent version, but on the Raspberry Pi I wasn't able successfully build a binding with it, a task we'll get to shortly.
After you have installed the above packages, we need to manually build the Tensorflow Node.js binding. This is a Raspberry Pi-only step, I'm unsure why it is necessary.
npm rebuild @tensorflow/tfjs-node --build-from-source
Finally, if you're using Typescript like I am, you'll need to adjust your tsconfig.json to include the skipLibCheck: true compiler option.
Predictive analysis script
I'm going to post the entire script to capture a still image from my Rasperry Pi camera, and then have it processed by both an image classifier model and an object detection model.
import * as tf from "@tensorflow/tfjs-node";
import * as fs from "fs";
import * as mobilenet from "@tensorflow-models/mobilenet";
import * as cocoSsd from "@tensorflow-models/coco-ssd";
import { spawn } from "child_process";

var filename = "./capture.jpg";
// Set camera arguments
var args = [ "-hf", "-vf", "-w", "2592", "-h","1944", "-o", filename, "-t", "1" ];

var spawned = spawn("raspistill", args);

spawned.on("exit", function() {
  fs.readFile(filename, async (err, data) => {
    if (err) {
      console.error(err);
    }

    const imgTensor = tf.node.decodeJpeg(data);

    const mobileNetmodel = await mobilenet.load();
    const mobilenetPredictions = await mobileNetmodel.classify(imgTensor);

    console.log("Mobilenet predictions: ");
    console.log(mobilenetPredictions);

    const cocoModel = await cocoSsd.load();
    const cocoPredictions = await cocoModel.detect(imgTensor);

    console.log("Coco predictions: ");
    console.log(cocoPredictions);
  });
});
I didn't have much success with the mobilenet model - it once accused me of being a sofa. Now, I believe the Javascript port is not the most recent version, and also this mobile-optimized library sacrifices accuracy for the sake of speed. Things may improve with time.
However, I was pretty pleased with how well the coco-ssd model ran. It detected various members of my family and pets in images and applied a class and bounding box where the object was detected.
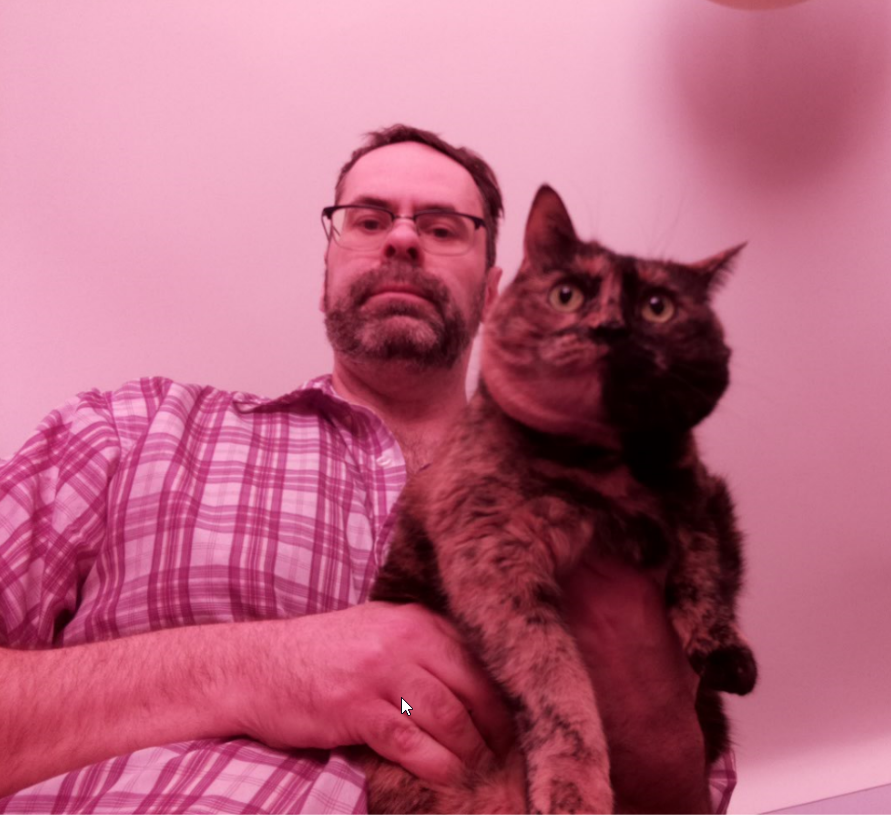
For the above photo, coco-ssd produced the following:
Coco predictions:
[ { bbox:
     [ 852.9707651138306,
       449.7543740272522,
       953.0751829147339,
       1483.4483785629272 ],
    class: 'cat',
    score: 0.9699275493621826 },
  { bbox:
     [ 32.730048179626465,
       286.1092700958252,
       1323.1229524612427,
       1671.2676229476929 ],
    class: 'person',
    score: 0.7677765607833862 } ]
Without a whole lot of code required, my little Raspberry Pi can now scan images and identify detections with a classification, bounding box and confidence scores. When I eventually get around to building a wildlife camera, I'm pretty much there!