The first step to creating a home automation IoT platform is to figure out how to manage message ingress from your device into the platform. This post will detail how we can leverage Azure's IoT Hub for this.
The IoT Hub ingests message at massive scale, but has a lot of other really cool features that make setting up my platform really easy:
- device registration and management
- remote control
- monitoring
- security
Setting up your IoT Hub in the Azure portal
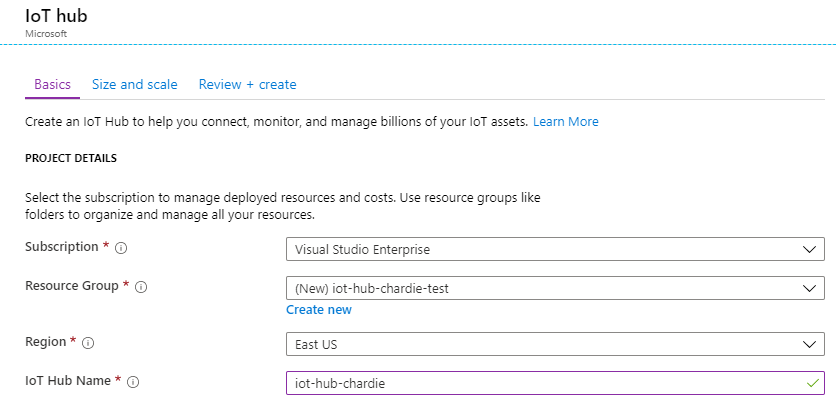
There are a couple ways to provision an IoT Hub, but we'll use the Azure portal. First, find the IoT Hub resource in the portal and click Create.
For the basics, you'll need to fill out your subscription, resource group, region and IoT Hub name. Your resource group and IoT Hub name must be unique to your region.
Next, select Size and Scale to set your hub's size:

What's really nice about the IoT Hub is there is a free tier! I already have a Hub, so you can see above the error indicating I can't have more than one. This is a fully functional hub, but with the disadvantage of a small message per day allowance of 8000 messages. If you are going to exceed this allowance, you'll need to bump up your tier to Basic or Standard. The big downside to the Basic tier is that you cannot send messages to your device, which is a showstopper for me.
Leave the Device-to-cloud partitions to 2 (you can't change it on the free tier anyway). More partitions give you flexibility to scale out ingestion during times of heavier load. For a home automation platform, 2 is more than enough.
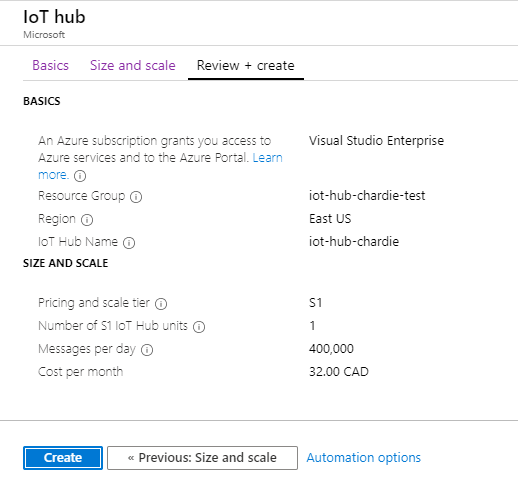
Review your changes, click create, and wait for your hub to be deployed:
Provisioning a device in the IoT Hub registry
Once your hub has been created, we need to provision a new device in the hub registry in order to generate keys our physical device will use to send messages to the hub.
In an enterprise scenario, device provisioning is a complex operation, with certificates burned onto device silicone and managed with something like the Azure Device Provisioning Service. For our scenario, manually provisioning a few home automation devices won't be particularly cumbersome.
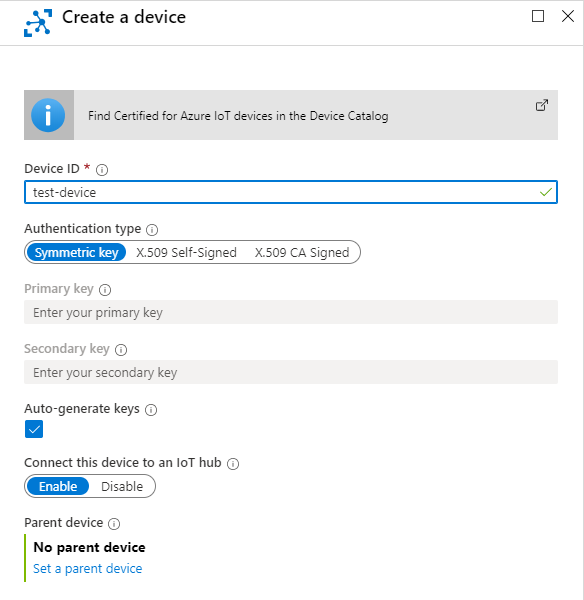
Click IoT Devices in the navigation menu, and we'll be presented with an empty list of devices. Add one by clicking New:

Assign a Device ID - it can be completely arbitrary what you call it, I'm going to call mine test-device, leave the Authentication Type as Symmetric Key, and Auto-generate its keys:
Once created, it will show up in our device list:
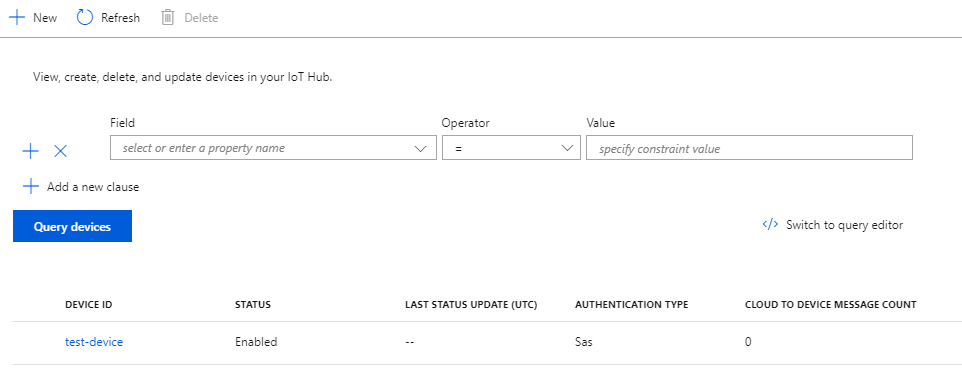
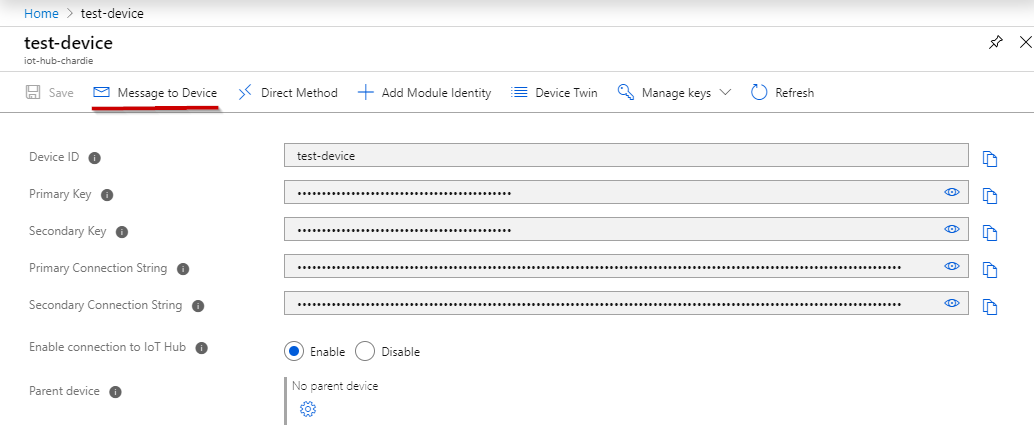
Drill into it and we access its keys, connection strings, manage whether it is allowed to connect to the IoT Hub and more. Note there are two keys so that if we think a key has been compromised, we can rotate the keys so as to invalidate the compromised one.
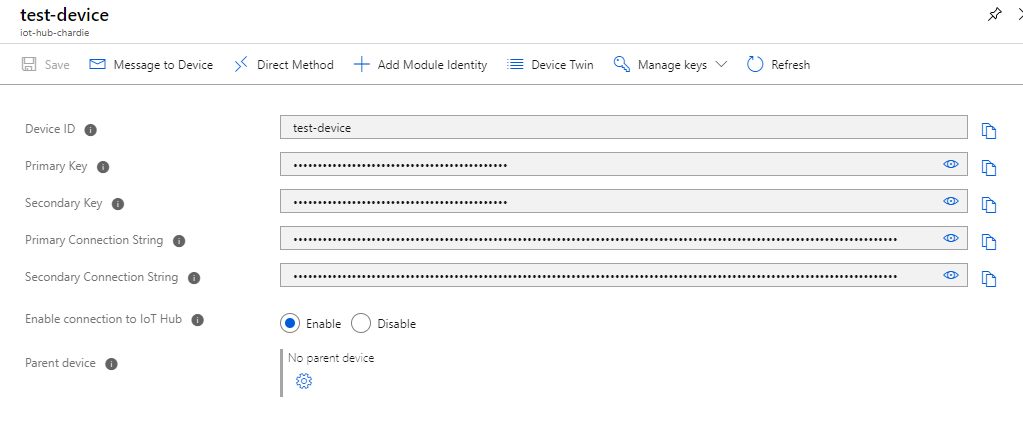
We'll come back after we have connected our device to check out some of the other functionality. For the moment, take note of your primary connection string as you'll need it in the next section.
Connecting your device to the IoT Hub
For the purpose of your device, it can be a Raspberry Pi, an Arduino, or you can use your plain ol' laptop. Anything that runs Node will work.
Create a new Node project with npm init and install these dependencies:
npm install azure-iot-device azure-iot-device-mqtt --save
Next, create an index.js file and create your IoT Hub client using your settings from when you created your hub:
import DeviceSDK from "azure-iot-device";
import Transport from "azure-iot-device-mqtt";

// UPDATE CONN_STRING WITH YOUR CONNECTION STRING
const CONN_STRING =
  "HostName=iot-hub-chardie.azure-devices.net;DeviceId=test-device;SharedAccessKey=XXXXXXXXXXXX";
const client = DeviceSDK.Client.fromConnectionString(
  CONN_STRING,
  Transport.Mqtt
);

client.open(err => {
  if (err) {
    console.err(err.toString());
    process.exit(-1);
  }

  console.log("Connected to IoT Hub!");
  // MORE AWESOME CODE TO GO HERE!
});
Note we are using Mqtt as our protocol, which is extremely lightweight with low bandwidth requirements, but there are also Https and Amqp protocols available with their own pros and cons.
Run the script and make sure Connected to IoT Hub! is logged to the console.
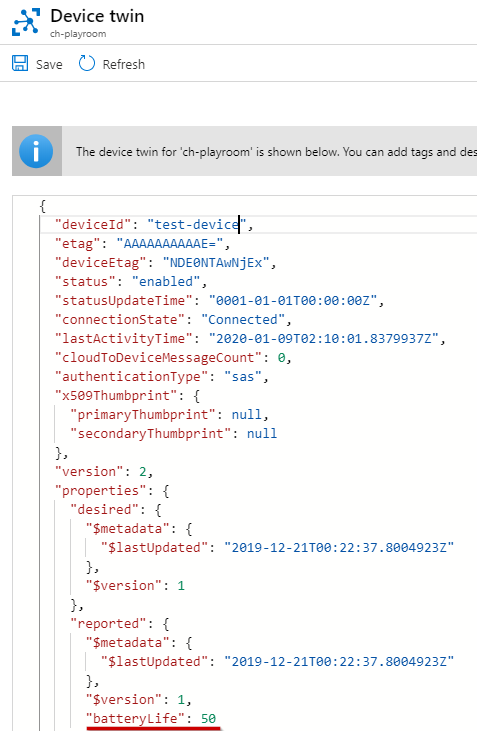
If we go back to the Azure portal and drill into our device, we can select Device Twin - which is a virtual representation of our device - in order to see various properties and metadata. We can see that our device's connection state is connected:
{
  "deviceId": "test-device",
  ...
  "connectionState": "Connected",
Now that our device is connected, we can start communicating between our device and the IoT Hub.
Device-to-cloud communication
There are two ways for your device to communicate with your IoT Hub:
- Telemetry event messages
- Device Twin Reported Properties
Telemetry event messages
The most common IoT communication scenario is a device capturing some telemetry data and pushing it to an ingestion service. For simplicity's sake, we're going to simulate a temperature being recorded and publish it to our IoT Hub.
When our connection opens, we will set an interval of 5 seconds where we will generate a random temperature reading and push it to Azure.
client.open(err => {
...
const sendTelemetry = () => {
// Generate a random int between 0 - 4 to represent a temperature
const temperature = Math.floor(Math.random() * Math.floor(5));
var message = new DeviceSDK.Message(
// SDK doesn't take care of serialization, we must stringify ourselves
JSON.stringify({
temperature
})
);
client.sendEvent(message, function(err) {
if (err) {
console.error(err.toString());
process.exit(-1);
}
console.log(`Message sent: ${message.data.toString()}`);
});
};
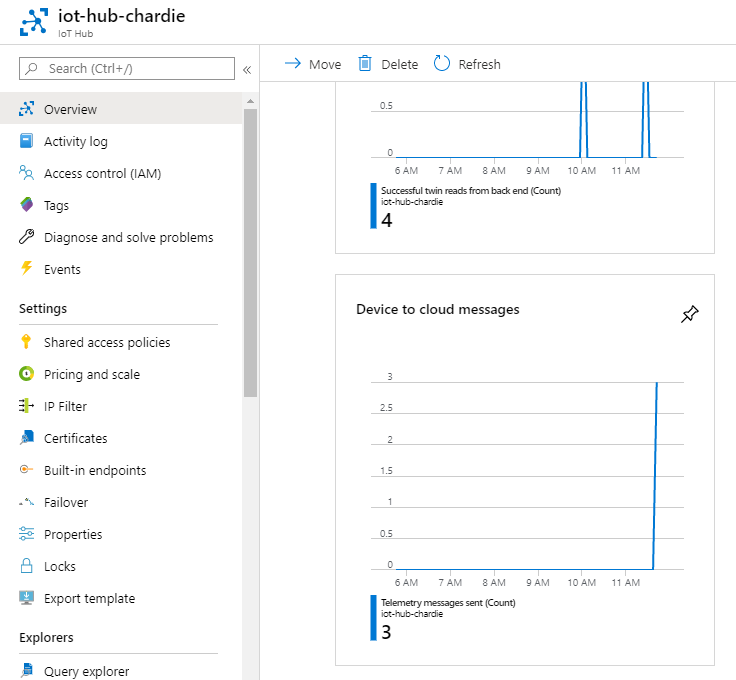
setInterval(sendTelemetry, 5000);Our console should start logging messages like:
Message sent: {"temperature":1}
Message sent: {"temperature":0}
Message sent: {"temperature":4}
At this point, if we flip over to the Azure portal and bring up the IoT Hub Overview window, we can see our Device to cloud messages being captured:
Device Twin Reported Properties
Note that this method requires the Standard (or Free) tier of IoT Hub.
This method of communication is typically used to communicate some status of the device so that it can be captured in its device twin, which is its virtual representation in IoT Hub. Device twins can be queried to provide rich detail about the status your physical devices.
To update a reported property, retrieve the device twin and make an assignment like this:
client.open(err => {
  ...

  client.getTwin((twinErr, twin) => {
    if (twinErr) {
      console.error("Could not retrieve twin");
      process.exit(-1);
    }

    const propertiesPatch = {
        batteryLife: 50
    }

    twin.properties.reported.update(propertiesPatch, function(err) {
      if (err) {
        throw err;
      }
      console.log("Reported battery life"));
    });
  });
});
Note batteryLife is completely arbitrary, your property could be named anything.
Open the Azure portal, drill into your IoT Device and click on Device Twin:
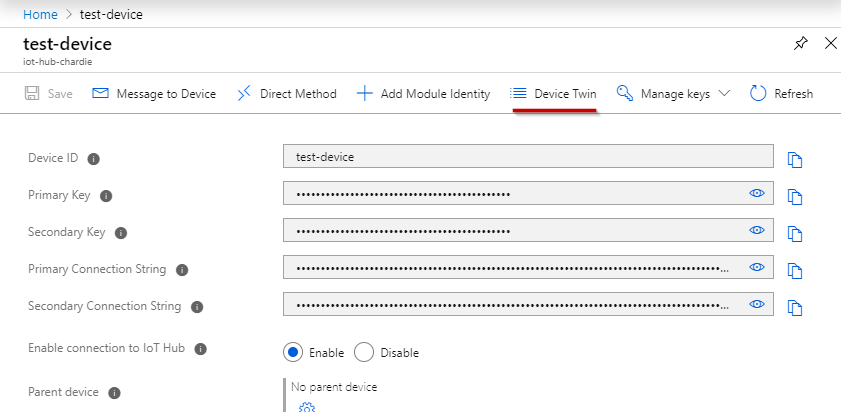
You should see its reported properties now includes batteryLife:
Cloud-to-device communication
There three ways to control your IoT device:
- Cloud-to-device messages
- Direct methods
- Device Twin Desired Properties
Note that all three methods require the Standard (or Free) tier of IoT Hub. Each method has different features which are detailed in Microsoft's documentation, but in brief:
Cloud-to-device message - These are unidirectional messages sent without the expectation of a return value. For the AMQP and HTTPS protocols, the IoT Hub can be made aware the message was processed, but there is no expectation there should something returned which should be acted upon. Messages are stored on the IoT Hub for 48 hours, and will be delivered once the device connects.
Direct methods - A direct method is an immediate invocation of a function that exists on the device where the function can return a value. This makes the communication fully bidirectional. If the device is not connected, the direct method will fail to invoke and will not retry.
Device Twin Desired Properties - These are properties on the device's digital twin that will be communicated when the device connects to the IoT Hub, there is no expiration of this message. These are intended to put the device into a desired state.
Cloud-to-device message
Receiving a message is just a matter of registering a handler for the device client's message event:
client.open(function (err) {
  ...
  client.on("message", msg => {
    console.log(`Received message: ${msg.data.toString()}`);
  });
While your Node app is running, bring up the Azure portal again, browse to your IoT Device and click the Message to Device link:
We'll add "Hi from Azure!" to our message body and click Send Message:
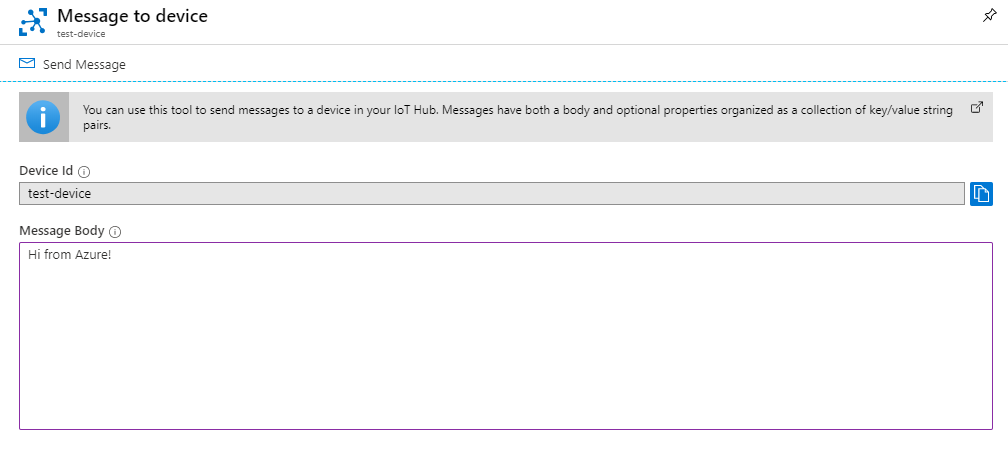
After you click Send Message, your Node app should log out:
Received message: Hi from Azure!
MQTT has no concept of completing a message, but AMQP and HTTPS transports do, and this will inform IoT Hub that the message has been processed in case you need to inform some retry or compensation workflow:
client.on('message', function (msg) {
  ...
  client.complete(msg, function (err) {
    if (err) {
        client.error(`Could not complete message ${err.toString()}`);
    } else {
        console.log('message has completed');
    }
  });
})
Direct methods
Similar to handling cloud-to-device messages, setting up a direct method involves creating a handler with the client's onDeviceMethod method. The following sample simulates receipt of a direct method message which invokes the device's setFanStatus method. The request payload is interrogated for the status value to apply to the fan, turns the fan on or off, and then sends the response to the IoT to confirm the fan is now in the desired state.
client.open(function (err) {
  ...
  const setFanStatus = (request, response) => {
    console.log(`Received: ${JSON.stringify(request.payload)}`);

    if (request.payload.status === "on") {
      fan.turnOn();
    } else if (request.payload.status === "off") {
      fan.turnOff();
    }

    const fanPayload = {
      currentStatus: fan.status
    };

    response.send(200, fanPayload, respErr => {
      if (respErr) {
        console.error(respErr.ToString);
        process.exit(-1);
      }
      console.log("response to setFanStatus sent");
    });
  };

  client.onDeviceMethod("setFanStatus", setFanStatus);
}
With your Node app running, open the Azure portal and drill into your IoT Device and click Direct Method:

In the Direct Method window, assign "setFanStatus` to Method Name, and add the following to the Payload:
{
  status: "on"
}
After clicking Invoke Method, you should receive a Result indicating the current status of the fan is on:
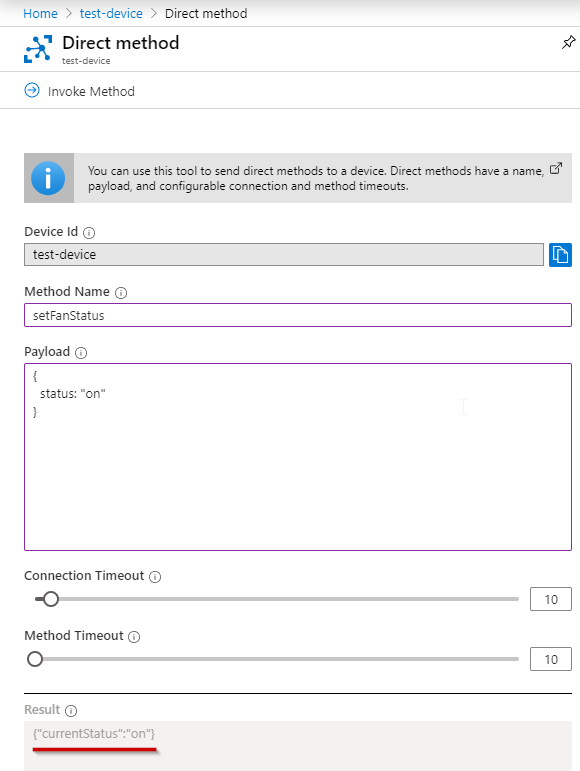
Going back to your Node app, the console should have logged confirmation it received a message and that it responded with a confirmation:
Received: {"status":"on"}
response to setFanStatus sent
Device Twin Desired Properties
Desired properties put a device into a desired state. In this example, we'll push down a message to alter the device's telemetry data push interval.
Using the device client, we request the device twin from IoT Hub, and when it is retrieved, we will set up a handler to handle change events to our custom desired property. Note that the handler will be invoked not only when the property has changed, but also when your application starts up with the current value of the desired property.
client.open(err => {
  ...

  client.getTwin((twinErr, twin) => {
    if (twinErr) {
      console.error("Could not retrieve twin");
      process.exit(-1);
    }

    twin.on("properties.desired.pushInterval", pushInteval => {
      console.log(`Received update to pushInterval: ${pushInteval}`);
    });
  });
});
In the above sample, we begin to observe a pushInterval property. This is something I came up with, it could be named anything. When the value is changed in device twin, the change will be raised on the device where it can be handled however desired.
With your Node app running, open the Azure portal, drill into your Iot Device and click on Device Twin:
You will be presented with a JSON document, which is the virtual representation of your device. Under properties.desired, add a new property called pushInterval and give it a value of 10:
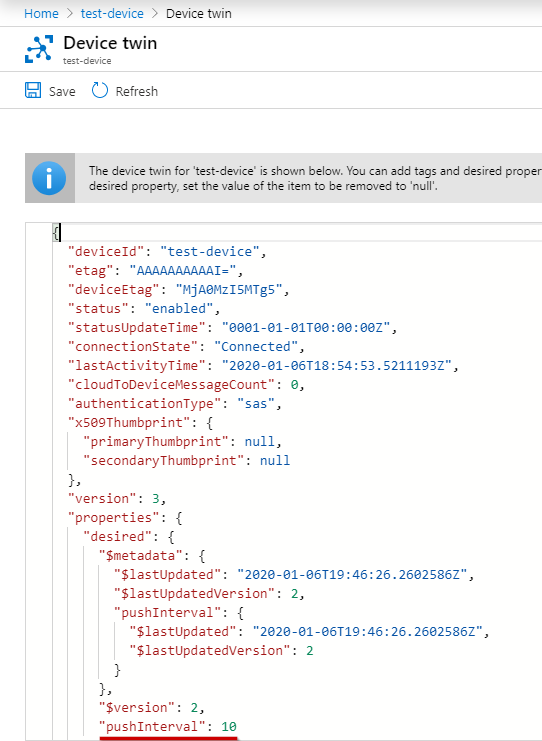
Click Save, and the change will be raised if your device is presently connected, or will be raised as soon as your device connects to the IoT Hub.
You can observe changes made to pushInterval in the desired properties' $metadata property.
Flip back to your Node app, and the desired property update for pushInterval should be logged out:
Received update to pushInterval: 10